Monday, April 21, 2014

Walls and Lights! We are looking like a trailer again!

Well it's Monday evening and time to recap the weekend and our progress. I could tell you this part was a cakewalk but it wasn't, it would have been if we'd put the walls in before the ceiling but we wanted to have access to the wiring behind them if we needed to down the road.

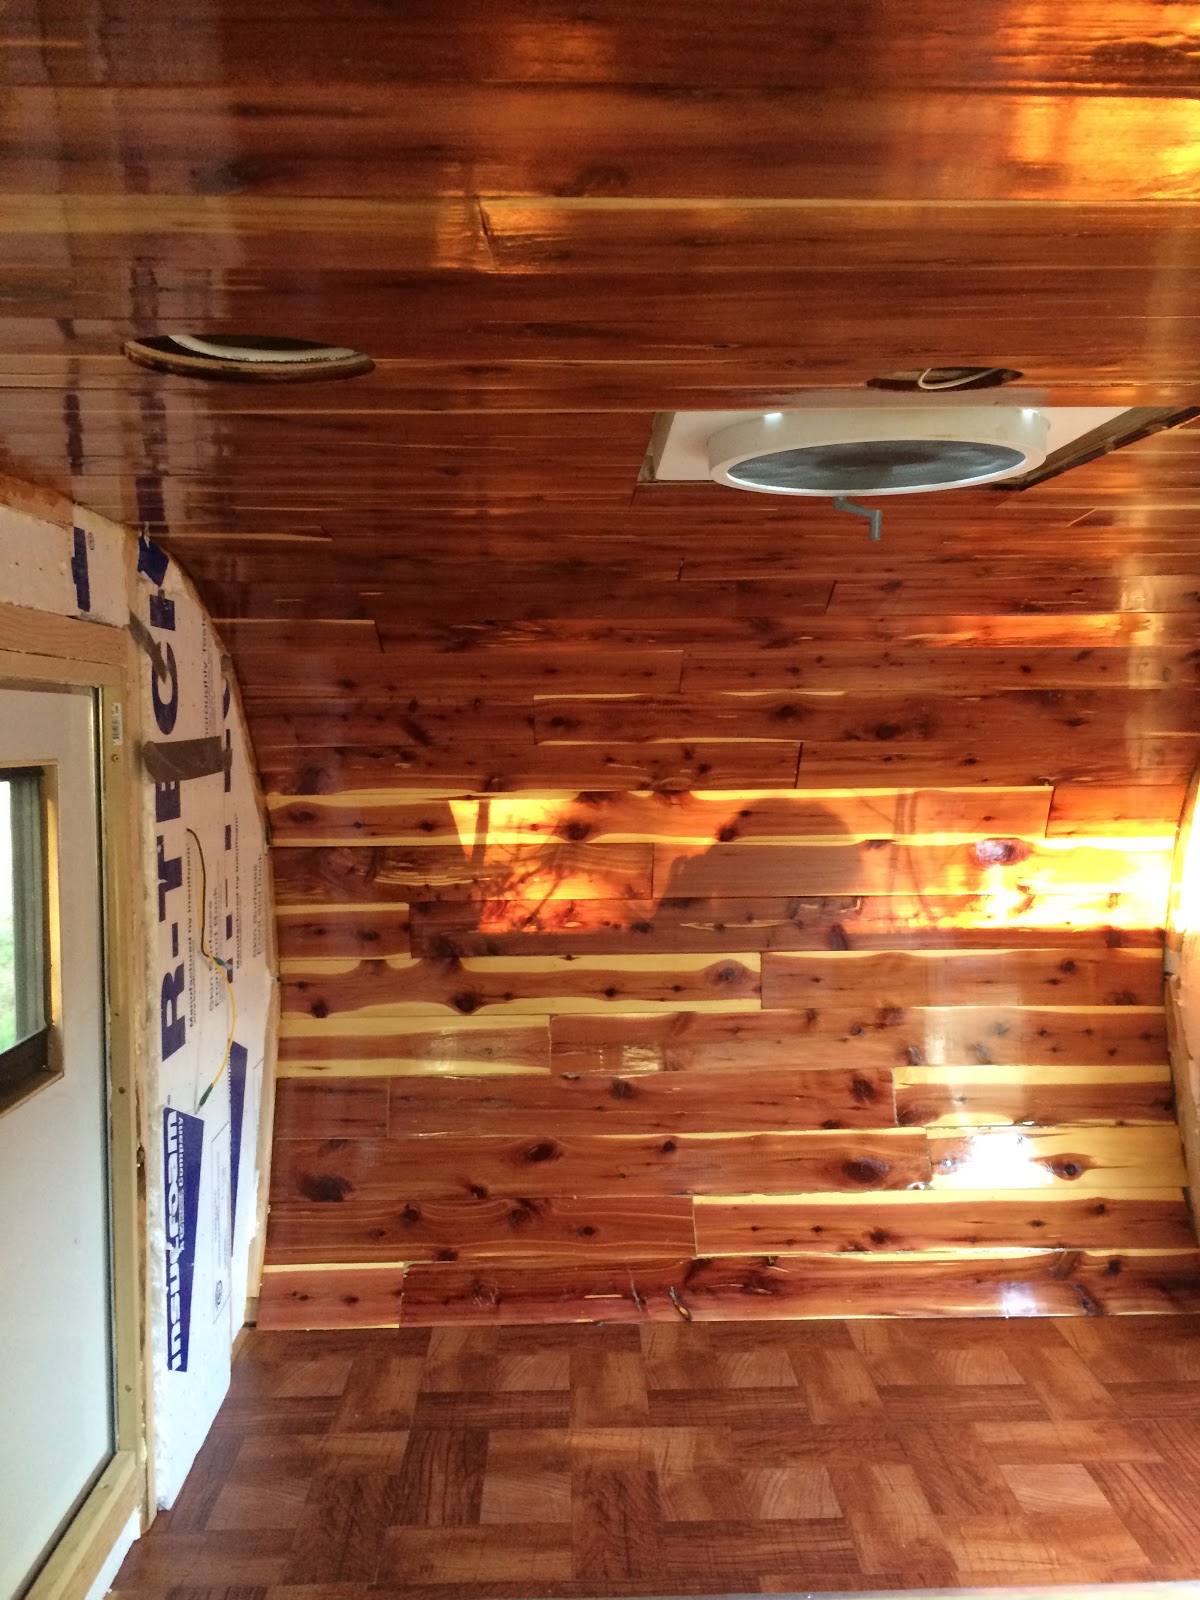
I recommend getting a cardboard trifold board to cut for the nose template.  It is easy to work with and once you are close you can snug it up and use a box cutter to shape it to the nose, plus it folds up and you can pass it out the door.  We saved ours so if we decided to change the interior we have it the next project. Saturday I spent the day shaping the nose template and then after taking Sunday off for Easter I was back at it this morning.  Our walls are not the same size but that isn't surprising there isn't a straight line anywhere in this trailer.  While they were in I had Bill hold them while I used the door as a template and drew out the new holes.  It took a little more time but I got them cut and shaped then stained the walls before putting them in.

Once the walls were in I attached the lights, fixtures, and put the frame around the ceiling vent.  I was excited to finally put up some of our wall art that I've had in a box since last August waiting.  I'm going to use copper as my edge trim, it should patina to a beautiful blue green and look sharp against the wood finish inside.  I'm still out working a bit tonight on it, I want to get the new wood cover cut for the under bed storage and I decided I would end with cutting and making the legs for our wood roll-up table.

Next weekend I am going to start on the nose cabinet, the galley cabinet, and hopefully get the stereo connected and the shelf installed.

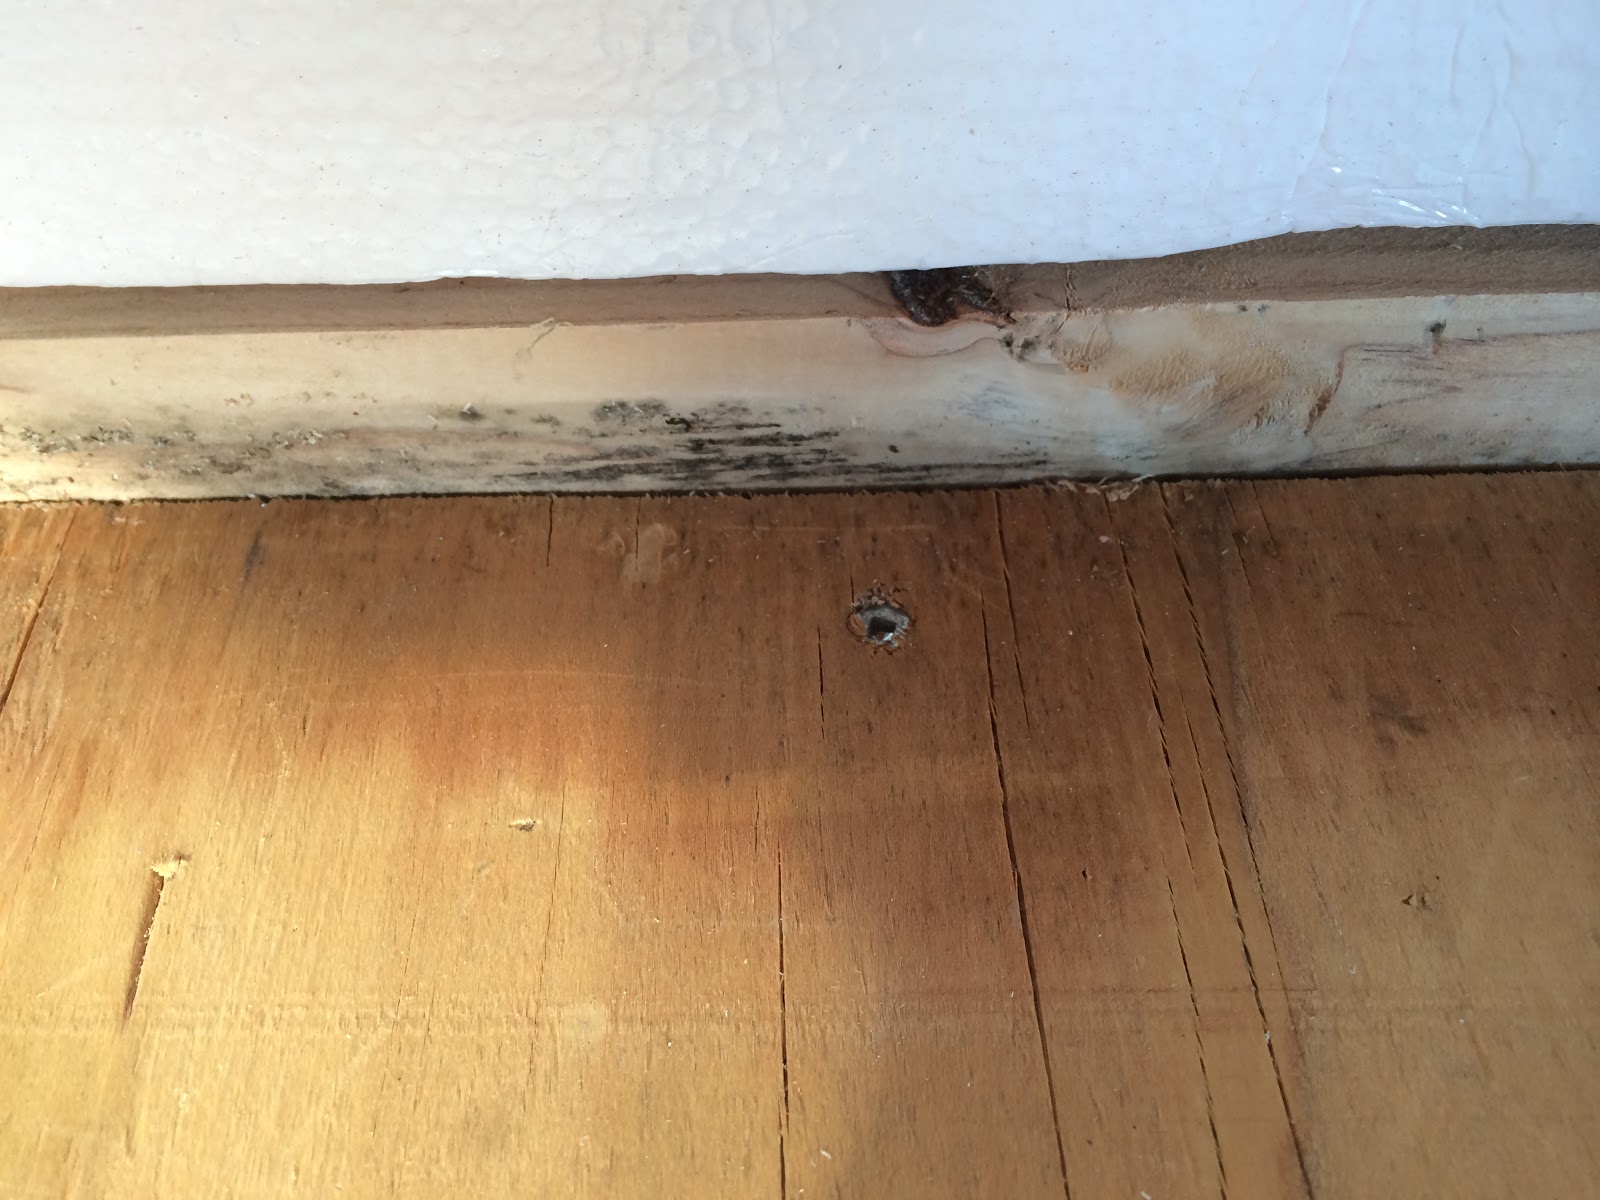
Had to show again the before photo.  Everything was so sloppy right down to the huge screws Crybaby Teardrop Trailers used to attach the walls.  

The cabin is really coming together nicely.  I need to trim out our seams and trim out the doors then I am down to just adding cabinets.


Our trailer theme is Route 66, I have fond memories of traveling it with my family when I was young and enjoyed making new memories last summer with my family.  That is what pushed us to purchase a teardrop.  

If I could go back we would have just built the trailer ourselves, essentially that is what we have done because we had to strip the trailer back to the bones.  

The door is framed out so much better now.  The bottom sill doesn't cut into our legs anymore and the wind doesn't howl through the gaps anymore.  Can't wait to camp in our new cabin!  Those windows go next!  I have our sliders ready to install.  We still have not been refunded for the slider windows Crybaby Teardrop never installed or any of the other upgrades we purchase and paid for that they chose not to install.

The cabin light and ceiling fan are finished off very nice.  They look so sharp against the cedar planks.

Our reading lights are back in and I moved the switches to the front of the cabin so when we are sitting in bed we can turn off the lights instead of having to crawl to the back of the cabin where Crybaby put the old switch.


Monday, April 14, 2014

Oh what a difference a day makes! The ceiling and floor are finish

I can't express the joy and satisfaction I felt buttoning up the trailer after finishing work on the trailer today.  Closing it up for the week is always hard because I think, "Oh just one more day...." but today it was magnified because I was so close to putting in the walls.

Let's take a walk back to how the trailer was delivered to us.  The ceiling, which was vinyl planks we special ordered and paid for out of pocket were put in sloppy showing the blue seams and falling down around us.  We never had a floor that was left as just raw plywood which was splintery and caught on the mattress, not to mention when it leaked both times it became mildewed and moldy.  Here is how things looked before.

 Mildew on the floor and frame from the galley and cabin leaking twice.

  This corner is just filled with mold and mildew from the galley hinge that is cut too short and leaks.


 This was our ceiling falling down around us and ruined because he didn't take time to line things up or support it while the planks dried so nothing stuck and we were out the cost of this special order product not to mention the numerous random staples he used without a pattern which tore through the vinyl planks .


 Staples were put everywhere tearing the vinyl planks and making the ceiling unusable when we took it out.  I was extremely upset because this cost us over $200 and it was money and product lost because Crybaby Teardrop did a horrible job installing it rushing after assuring us they could install it to perfection and actually just not caring what they delivered to us in the end.  They had our money so they didn't care what they delivered.

 We never had a floor it was delivered to us as raw plywood.

 This is another project, I have to hire a welder to weld a proper bottom to this storage, right now it is only this flimsy plastic sheeting.

  Here is a panoramic of our trailer before I started the repairs showing the water damage to the bare floor and how nothing fit or was constructed well.


Okay now are you ready?  I mean are you really ready??  You are not going to believe how it looks today!  I spent many long hard hours to get this trailer where it is now, my muscles hurt and my hands and knuckles are raw and cut up.  I can say I have put blood, sweat, and tears into this trailer.... and a CSI investigator can verify that.  LOL  I ache today but it's a good ache.  I worked from sun up to sun down throughout the weekend, only taking a break to be the photographer at a charity tea party on Sunday.

I am covered in sawdust and I can't lift my left arm, but girls you can do this don't think it's out of your scope.  I know I was my Dad's shadow and learned all my skills following him and my Grandpop around in their carpenter shop.  I do wish they still had it or that my dad was still here close; I think I'd be done by now if I could use his tools and shop.  My Dad, Kyron Collier is the voice in my head telling me to slow down, take my time, and check that cut one more time.  I am ever thankful for the both of them and all they taught me.

Okay so now that I have you wanting to scroll down let me show you how the trailer looks now.


There are no nail holes as I puttied them all then sanded the ceiling smooth before sealing it with a semigloss clear marine quality sealant.  I am very proud of my work, it took time but it was worth it.  The floor we used peal and stick linoleum squares.  These are the squares we gave him for our galley that he used on another build then never replaced.  I took my time with these too; I of course starting in the center and worked out to each side so the flooring remained balanced in appearance.  I did cut my hands numerous times on the paper and tiles and once from the knife when I didn't look where I set it.  Good thing my hubby was close by for a band aid and towel and he is always as we call it, "my tool monkey" holding my boards, supporting my planks for installation, and assisting me with tools.  He trusts me and I couldn't do this without his love and support.

I have to tell you all that this trailer was built excuse my language as it is not me but there is no other way to express this.... Ass Backward!  A teardrop is built first by building the base and sealing it, then flipping it over and covering the floor with whatever flooring you have chosen, then the bones go in (ours don't go to the floor.... another Crybaby job done piss poor.) After the bones you skin the inside so you can install lights and such and run wiring, then the insulation and you finish with the exterior.  This trailer was built all over the place with no plan, no direction, and no professionalism.  It has been a challenge to run down the issues and fix them because nothing is cut right or done right making the repairs longer and more costly.  We are getting closer but every repair is a new issue and new hurdle to cross.

Stay tuned for next week and the long awaited walls!!!  After the walls I can make the new galley shelf then the cabin cabinets.  After we are done with those it's on to the undercarriage and welding projects.  I have to secure and protect our wiring underneath and of course seal the whole undercarriage since Crybaby Teardrop left that as raw plywood too.

I'm signing off exhausted but very happy with where I am with the trailer rebuild.


Saturday, April 12, 2014

We have a Ceiling!!!!

Oh what a day I didn't want to come in, it's days like today I wish I had a shop to work in because I'd still be out.  I started early this morning once Bill had come home and went to bed.  I added the last two pieces of insulation for the ceiling, the last sub ceiling then I started trying cedar planks fitting each section to perfection.

When I got to the speaker holes I used one of the little squares Crybaby used as speaker support instead of actually making a wall for my template to draw out what I needed to cut.  It was a little tricky using the jig without someone helping by holding the wood but I got through it and everything fits beautifully.  I continued the cedar all the way to the galley and once they were all in I went back and puttied my nail holes.

I climbed up to our XM antenna and cut it out to install the new undamaged one.  Crybaby had cut about two feet from the original.  I took my wood chisel and made the hole larger so the new antenna could drop in without trouble. I used the marine glue to make sure the antenna was watertight and secure and routed everything to the center back where the radio will be.

Monday I'll finish sanding then seal the cedar.  I kicked around if we wanted to seal it or oil the cedar and I think in the long run with our extreme summer dry heat it will be best for the wood.  The speaker connectors came in today so once the ceiling is dry I can finish wiring those.  Monday will be another busy day I'm going to cut the walls and install them too. I was so happy getting to this point, finally I can see an end to this and the trailer now looks so pretty like it always should have.  I no longer look at it and want to cry now I want longer days so I can keep working.  We can't wait until the next teardrop gathering in June to show our friends how far we've come.


Stay tuned because I will share more on Monday when I'm done.  I'm also trying to move this blog to my new teardrop website, www.crybabyteardroptrailers.biz.  I haven't had time yet to play with it enough to move it but that will be my teardrop blog's new site.  Once I'm done with the trailer I'll be reviewing campsites, giving camping tips and tricks, and sharing other awesome trailers there.

Monday, April 7, 2014

Starting the Ceiling and Installing a Vent Fan.

Well what a fun weekend, busy but fun.  This weekend we started to add the ceiling to the cabin, we chose to go with cedar planks. This was actually our first choice when we ordered with Crybaby as a replacement for the wallpaper ceiling they offered but he said the vinyl would be better so we went with that; unfortunately the vinyl was ruined by Crybaby when they put it in and there was no reusing it so we went back to our first choice and cheaper choice.

The vinyl planks we had originally special ordered were beautiful African wood and Crybaby said that they would have no problem installing them instead of the wallpaper, we took samples to them, gave them the product number and store and they went and checked it out and said yes so we placed a large special order for the planks.  This again was a cost we paid for ourselves because we didn't want wallpaper for a ceiling and they ensured us they'd be happy to swap it saving them again in supply cost.  Crybaby installed the vinyl using staples and tearing the vinyl and they used some glue that when the cabin leaked the glue melted and almost ruined my vintage chanille bedspread and pillows I made.  The glue was a joke they barely used any at all and it didn't even make contact with the under-ceiling.  If they would have taken the time to do things properly and support the planks as they dried and used proper glue the vinyl would have been beautiful but instead they like in so many other things rushed and cut corners because they want to do things cheap (low grade material as cheap as they can get away with.)  Later when we voiced our displeasure with the staples tearing our ceiling and how they were placed all over without rhyme or reason they then changed their story saying the vinyl wasn't meant for trailers and he was going to charge us extra for the installation.  The flooring package says it is not meant for direct sunlight...... the ceiling doesn't get sun, just saying.  This was not an extra just a replacement for the tacky wallpaper and something agreed on way back in August.


 This is why we had to replace our ceiling.

 You can see the glue used didn't event make contact with the under-ceiling, even below you can see only small spots they actually made stick.


  The under-ceiling was 2mm plywood, not even strong enough to support anything attached to it.


This weekend we put in about 1/4 of the ceiling.  We used 5mm plywood with a mold and mildew barrier backing as the under-ceiling.  We used 1" wood screws with a flush head to install the under-ceiling to the bones. The cedar planks are tongue and groove and we used a high quality wood glue and 1" brad nails to secure it to the under-ceiling.  This ceiling is ON!  I went back this morning and puttied in all the nail holes and next weekend after the rest is installed and puttied we'll sand and seal it.  We picked up a pneumatic nail gun and oh boy oh boy I think it is my new favorite tool because I'd still be out there with a hammer without it.  I framed out the new speaker location in the ceiling and ran the wires then laid the rest of the ceiling insulation so we can finish the ceiling next weekend.  Once the ceiling is in we can cut our new walls and start to close up the cabin.


The treat I splurged for and came just in time today was a ceiling vent fan.  This is the greatest thing since sliced bread and super easy to install, it fits right into a standard 14" ceiling vent and connects with 18 gauge wire and a 15 AMP fuse.  Easy peasy, I had this hooked up and running in under 15 minutes and the cost is okay around $75.00 and worth it.  It has three speeds on forward and two in reverse.  We can see the light at the end of this tunnel now and I think I'll have this completed by the end of May and in time for the next Teardrop Gathering and our vacation.  Stay tuned next week because we'll have the new speakers in and hopefully the walls.  I have to wait for the new XM antenna to arrive before installing the stereo since Crybaby cut the original antenna that it came with making it useless.


Tuesday, April 1, 2014

Skinning Interior and Our First Teardrop Gathering

Last week I insulated and started skinning the cabin so we could attend our first teardrop gathering.  This is just the under skin as we plan to cover it with a nicer wood.  We found the measurements were all over the place so we took our time to get the proper fit to each piece.  The insulation made all the difference when we slept in it.  You could still tell the doors were not insulated or fit properly and drafty but the overall cabin stayed nice through the night.  We don't have all the insulation in yet because I still need to wire the stereo, speakers, and USB ports for the cabin.  We also have to get a new XM radio antenna because Crybaby cut the one that came with our stereo then tried to solder it together.  


We pulled out Saturday morning heading to Lake Perris and our first Teardrop Gathering.  The gathering was fun, we met a lot of new folks and saw some amazing teardrops.  I believe there was 127 teardrops that attended the event.  We went for just the last two days due to work but we enjoyed our time with our new friends.  Saturday everyone had their tears open to the public and we talked with people just starting their build or thinking about building.  Since we've had to take our teardrop all the way back to the shell this is our build and shared our experiences with others.  We made no mention of Crybaby, just simply said the person who built our box we could not recommend in good faith.  Some of the lookers liked that ours was not complete and they could see what it takes to restore or build one.  I told them to head to the forums as there are so many helpful and knowledgeable people there who will help and point them in the proper direction.

The creativity of group was amazing, I don't think I saw two tears that were the same.  There were I think three other teardrops as large as ours supporting a queen mattress inside, most were the standard size and as unique as each owner.  Saturday evening we attended the potluck with my buttermilk coleslaw, plates, and chairs in hand.  The organizers did an amazing job with this event, it is not easy to put together an event especially on a large scale such as this and over several days.  They went to every detail and comfort and my hat is off to them, "Thank you so very much for your blood sweat and tears I know went into this event."


After we returned home with new ideas, a fresh outlook and new energy I started back into work on the trailer. Well work seems to have been coming along at a crawl but I'm in no rush, I want things done properly not like what we received so I'm taking my time.  I added a wood wall behind the aluminum skin here in the galley for support and stability, now my galley wall doesn't wiggle or bend.  I found great tin tile frames that work out perfectly to hide where the speakers were in the galley.  Who would put speakers next to a sink?  I made the one next to the sink a message board using chalkboard paint and a magnetic board.  The other I made into our housing for our light switch and charger port.  It took a bit of creative cutting with my little jig but I think they look very nice.  I purchased three of the four I need; the other two will be speaker housings, we are relocating the speakers into the galley lid so they are out of the way and won't get bumped or wet.  I used 1" x 1" poplar and framed them inside so that I could use screws from behind to affix them to the walls.  The color matches the patina of our sink and the blue in the mission tiles.


I removed the scrap plywood shims that didn't even fit into the dead space from the doors jams cut too large and lopsided for the doors that were installed.  I used spray in foam to seal the drafts then used 1" x 1" poplar to cut and fit as a proper door frame.  Now the bottom doorsill doesn't cut into your legs when you sit in the door.  What a difference that made!  


The rain came after I knocked off for the day cutting work off for the week.  I can't wait for the weekend, I've ordered a fan for the vent, speaker wire, and a few other items to finish off the interior projects.  Oh if you plan to insulate your trailer and run speakers behind the walls make sure you have the proper wire that does not heat up.  Be sure to use wire that meets local building and fire code.  Use UL-rated wire labeled CL2 or CL3 for in-wall installations of speakers and audio/video cables, and CM, CMR, or CMP for in-wall installations of Ethernet cable.  We went with a 14G wire for sound quality but 16G is fine if you aren't running it very far.