Monday, June 30, 2014

Pull Out Shelves and Decal Details

I have to start by tell you all it has been 107*F here every day and not a cloud or lick of shade to be had.  This has made it miserable to work outside but it needs to get done so we come in during the rough part of the day but at it during the early morning and late afternoon working to fix the trailer.

I had to stop working and fix one of the shock mounts inside the galley on the side where the lid is 2 inches short.  The screws Crybaby used pulled out of the wood...... no surprise with the way this trailer was constructed just aggravating and takes time away from other fixes.

Today I was working on putting in the pull out shelves for the stove and ice chest and I took a bit of time to put in a plexiglass shelf under the sink and sealed it off with silicone so now if water gets under the sink it won't get on the stove or battery.  The sink rests well on it and it gives enough room for me to store the drying mat, sponges, and dish supplies.

I found at Michael's today some great stickers to help me make the galley supplies match and rock.  I'm actually using these as the back stickers, the front stickers will be in Cherokee... these will be the cheaters in the back so the family doesn't add something that shouldn't be and so they family can use our camping time to learn more Cherokee (our heritage).  Cherokee is one of the dying languages of our Indian Nations.  My native and my husband's native roots run deep.  I have the bone hair ties my great grandfather carved when courting my great grandmother.  I can tell other stories but that would be another blog. My husband's family was born on the reservation in Oklahoma..... my family hid in the hills during the Trail of Tears and when growing up we could only speak Cherokee when it was only family around.  I will share one of my favorite "Government Rations" recipes with you at the bottom of the blog.


When we returned today from picking up a few things the mail had delivered our car stickers that I designed and had made last week.  I did have to cut the door stickers because when I designed them I designed them for the D shaped doors we ordered but they did turn out really nice and make the trailer really pop.

Perfect blue color match to the FJ and the retro look now carries through inside and out.

The Blue Guppy decal is now on the front and the back of the trailer.

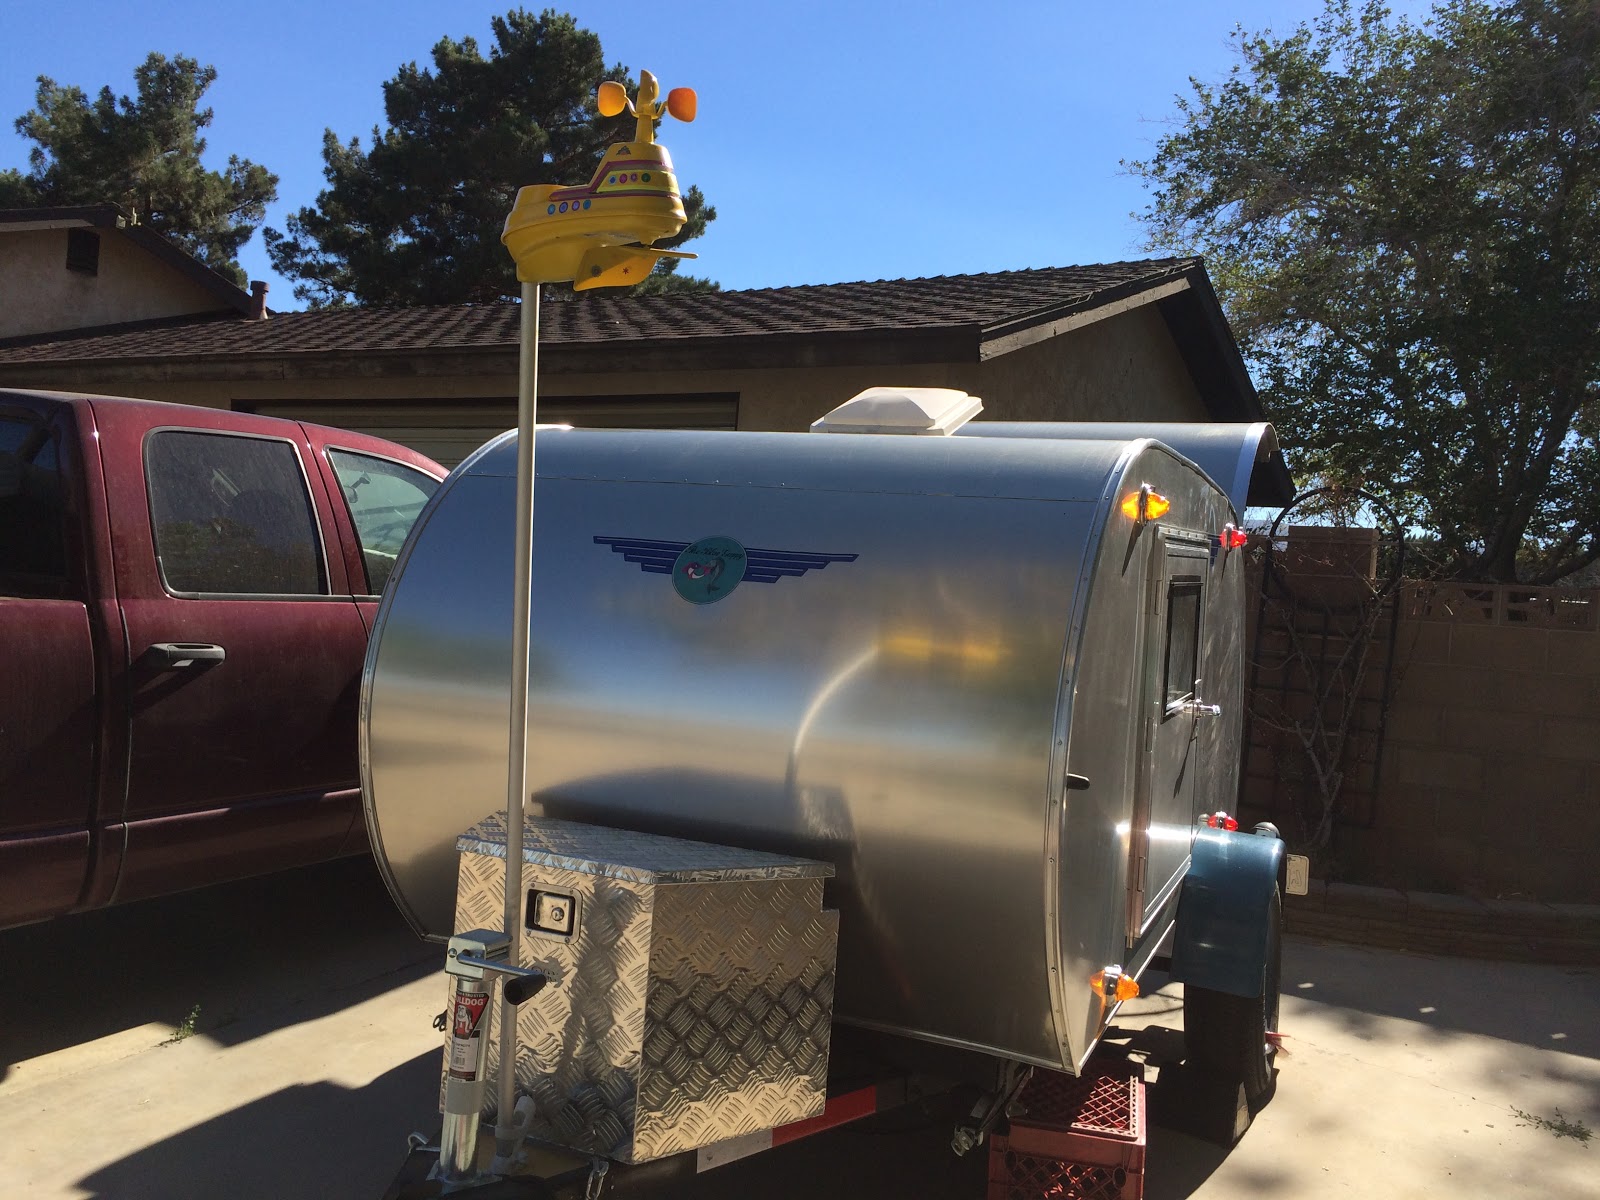
The Yellow Submarine flying high over the Blue Guppy... you know when we are in the campground now!

The door decals do take the hard edges off the rectangle doors.

I designed the logo up after the Blue Whale on Route 66 but since we are small we are only guppy size.  Mr. Limpet and Lady Fish round out our retro theme and always bring up great memories.

I love how the decals match the running lights I purchased.

A little sign I created to hang outside when we are set up in camp, a family crest for camping.

I added a plexiglass enclosed shelf under the sink and sealed it so that if water gets under it will not get to the stove or battery.


This afternoon I worked on installing pull out shelves for the butane stove and the ice chest.  This has been a project!  One side the clearance I must make to allow the rails to extend out is 2 inches, the other side is 1 inch; then for the ice chest one side is 2 1/4 and the other 1 1/4.  I'm telling you every time I measure something I have to measure it all the way around.  The shelf I put in was 18"x16" in the front and 18"x15 3/4" in the back.  It's like they just didn't take any time at all to really make their work matter.  It reminded me of when my Dad and I tore out the bathroom in the house we lived in when I was in high school.  The beams were all uneven but then we found old beer cans sealed behind the drywall and then the picture was clear.

I called it quits tonight before I got finished pictures.  I still need to level and install the shelves, I'm waiting for the glue to dry so in the morning I will be back out before the sun comes up.  The rails I'm using are rated for 100lbs and tomorrow I'm heading back out to get a small piece of about 5-10mm aluminum to cover the stove shelf so it's easy clean up when things splatter a bit. 

Tomorrow I will be finishing these up and installing the galley shelves and solar regulator by the battery.  I mused the placement around a lot.  The clearance needs to be 4" from the top and bottom and the battery and fuse box are wired into the regulator.  I thought about putting the solar regulator by the fuse box inside the cabin but when I took it and looked at where it would be it didn't work anywhere in the cabin so I have to install it in the galley where the battery is now.  Eventually I'm moving the battery to the front of the trailer which will give more room in the galley but the solar regulator will remain.

Chinese Chile

Hamburger
Rice
Tomato Paste
Seasonings

Brown ground beef with salt, pepper, garlic, and onion powder.  Add to rice, tomato paste, and water. Season to taste and add water for thickness.

Saturday, June 28, 2014

Ahhh... Vacation, now can I get me some elbow room!

Well today is the kickoff of our month at home and having some fun with the family.... but first things first, I have a laundry list of fix-its for the trailer so today I got up and got out to working.  I may end up with several posts this week so check back often.

Today is a wiring day, I started with the 12 volt amplifier and the speakers.  Man oh man it's great having music and satellite radio to work by and boy does it look great!

We used an old tin tile picture frame that match the ones in the galley as the speaker boxes in the cabin.

The color really brings out the wood in the cabin and the style matches well with the retro look.

Got the tunes rockin' the cabin.


XM is our way to go so no matter where we are we can listen to good music while we enjoy good company.

This is the little 12 volt amplifier, it gives a cute little light show when on too and doesn't pull a lot of energy.


So as I've been going along I've been doing little things to make our trailer a home away from home while we're out.  One of the little things is repurposing plastic jars and jugs into lightweight usable items to glamp with.  With a little blue paint made for plastics I created a style for some must have items.


I have to share this sorry, the blue is a perfect match for our FJ Cruiser we pull the trailer with.  I also have the auto paint to repaint our wheel fenders and rims to match, Crybaby was to do this and I gave them the website and exact color number but like with so many other things they decided to just use a cheap spray paint that didn't match and one side has faded in the sun and now doesn't match the other side.

Next up is the solar panel battery charger with flow back prevention.  Our youngest has agreed to help me wire this one, she's our green baby and loves that we are going solar with the trailer.  The panel is large but it's more efficient than the smaller ones and where we camp we don't want to take chances.


Tuesday, June 17, 2014

Windows, Doors, and Table... Oh My.

Well it's another week and another entry into never ending story.  I pulled out the fabric I've had since we placed our order with Crybaby and finally had an opportunity to make curtains for the trailer.  With so many other things I've had to focus on curtains weren't high on my list but as we've gotten to a place where we are camping in it more I felt curtains were needed now.  I had purchased some black out fabric but found we don't really need it and I think I'm going to use it to make awnings for each door.

This brings us to one of the other things that wasn't high on the priority list but it has been a huge sore spot since they were installed..... the doors.  We had of course picked out and agreed upon D shaped doors, however, Crybaby changed them without consulting us and we were surprised when we went down and found the huge square doors in their place.  I wanted to cry when i saw them it ruined the vintage look we were going for and they were not what ordered or paid for.  We had to go with them because they were already cut in the frame.  As I've been working on the trailer I've found and you've no doubt read about how they were not framed right, the opening was cut too large for the doors, lopsided, not sealed properly, leaked, and we had countless other issues.  Well I worked through those and got down to just a few things left on them, replacing the crank out windows with slider windows, framing out the windows, and getting rid of the ugly white acrylic they used instead of wood.  I mean really it didn't match anything in the trailer, yet another horrible job and lack of professional detail.

In order to hang the new curtains I needed to address white walls because I didn't want to take two steps forward only to circle back and address it later.  I ordered some vintage road maps from gas stations of years gone by and used them as wallpaper.  I chose maps of route 66 to continue with our theme and then with some Mod Podge and a brush I set out and started erasing the ugly white.  The wind was my biggest obstacle today while managing to keep the glue wet and the map from flying away.  I was wishing I was working in the storage unit but didn't want to let the wind best me.

You can see how much framing I had to do to get the doors to fit properly and not be drafty anymore. 


I had to cut the curtain rods down to fit the windows and doors.  The smallest I could find were 28" so I had to cut 5" off to fit the space.


The maps look so cool as wallpaper and I added some vintage travel stickers to really make them fun.


Now we have privacy in the trailer and I don't have to see those ugly white doors.


The brown at the bottom of the door is a strip of pockets I added to hold flip flops for late night runs to the loo, cell phones, keys, flashlights, or anything you don't want to get lost and want it close.


You can see the pockets a bit better here.  It's great having a place for your flip flops or shows instead of leaving them outside in the damp.  Now my shoes and the flashlight are right there.


This was my bonus project for the week.  This is our camp table which rolls up and fits in a bag.  It came with short legs which makes it a great table to hang by the fire but too short to eat dinner at.  I cut four new legs and drove threaded anchors into them so they screw in like the others and they all fit in the bag together.

I started wiring our speakers too and had to order a 12 volt amplifier because the little XM Roady's volume isn't quite loud enough without one and we decided instead of paying for another subscription using the Roady from my car is a better choice.  I should have it all put together by the weekend.  So this is where I ended my trailer projects for tonight but not for the week.  I plan to take advantage of the cool weather and longer days and work on them until the street lights come on all week.

Oh I almost forgot the coolest side project I did this weekend!  You all remember the weather station we purchased and mounted to the front of the trailer, well I got creative with it.  As soon as we pulled it from the box I told my husband it looked like The Yellow Submarine.  Well I masked off all the sensors and with some yellow spray paint and some well placed graphics I transformed the weather station.

Before


You have to have fun.  


Tuesday, June 10, 2014

Tweaking

Hello everyone!

Well this last week I took a step back to evaluate what I needed to work on and decided to make a few tweaks and changes to the original plans.  You see we purchased an XM stereo for the trailer so we can have our music without interruption anywhere and since it wasn't connected correctly and didn't work I was taking my time putting that back in until this weekend.  This weekend we took a short spur of the moment trip out with our youngest.  It was a, "hey what are we doing this weekend... nothing?  Well let's see if we can't get in at Kirk Creek" type of weekends.

Well we packed everything up that night and waited for storage to open the next morning to get all the trailer stuff (eventually the trailer will be there too when I'm done) and off we went.  I had taken my XM Roady XT to listen to the Belmont race and hockey game without having to scan through my husband's radio.  When we set up camp I looked at my XM and my Ipod home and the XM antenna I had already replaced on the trailer for the stereo and decided to try them all together... success, we had XM through my little Ipod home speaker!  Well this got me to thinking..... do I really need a big car stereo in the camper or could I hard wire my Roady to the speakers and use it and save on another XM subscription.  So we just gain space in the cabin and we have XM radio wherever we camp.

The Roady is about 3" x 3" with the base and you can program up to 30 XM channels.

We had added a weather station before we left and I highly recommend getting one with a storm alert feature as ours has.  The base runs on batteries or we can wire it in and the weather station runs on solar or battery.  It was great knowing what the weather was like before opening the door during the night and in the morning.  It brought over other campers and my husband said, "It's a cool old guy gadget."

I plan to paint the base yellow and add some stickers because we have dubbed it "The Yellow Submarine."

We added a wood base to the tongue and used a flag pole to mount the base to.

Our cabin stayed 73* and the outdoor temps were 64*.  We didn't turn on the storm warning feature because it was a weekender and we already knew it was to be sunny but we will be using this when we head out of state or take longer trips.

I decided to add a pull out shelf I can mount our little butane one burner stove to in the cabinet and I'm going to be putting that in later this week along with some of the kitchen improvements.  I'm going to seal off under the sink so if water drips from the sink hole it doesn't get on the stove or anything under it or damage any of the wood.  We are going to move the battery to the tongue so we can use that cabinet for more storage.  I'm also going to add a pull out to set the cooler on and I think make a curtain so it is hidden too.  This brings me to our curtains!  

I tell you when you are building your teardrop take it out and camp in it as you are working on it, it really does help with setting it up the way you want it.  So I brought the blackout curtains with us that I was going to repurpose into our window curtains.  Well they are great we really don't need them so I am going to turn them into awnings for both doors.  I also decided I am going to create an awning to swing out from the galley and give my prep area more shade without wrestling the easy-up.  It's little tweaks like this you learn as you camp in it a couple times and since we aren't finished it's easy changes right now.  I know for my side of the door I am making a pull around changing area so I can change standing up.  I'm adding pockets to the doors to stow shoes, flashlights, keys, and such in them and easy to grab and go.

A new gadget we are going to be bringing along a 12V powered shower.  California campgrounds are under water restrictions so no flushing toilets or showers until the drought ban is lifted which may mean all season so we want to be prepared. I'll get photos when we have it up and running

While we camped we had a lot of folks again stop in and look the trailer over asking questions.  The hubby is getting used to it a bit more and we had fun answering and giving tours of the camper.  Be prepared you will have company, a teardrop brings out the friendly in people. When we were heading home we ran into a couple that were camping in a tear they rented from Vacations In A Can.  They wanted to camp in one to get ideas for the one they were building.  I opened ours to them when they asked about the size, they may be making theirs a bit bigger now.  LOL


We were on a hill which reminded us that we still need to have new stabilizer jacks mounted to the frame. 

I see now where I need storage and how to make it work for us better so time to add some new features to the galley.


This time out the big hit when the stars came out were glow in the dark bubbles! These are extremely cool and wherever the bubbles popped they left behind glowing goo which made the field look like there was a firefly massacre on it after 30 minutes of bubbles.


The bubbles can be found at Walmart and are an inexpensive way to keep the kids entertained.


The California coast has so much to see and do and one of my favorite areas to photograph.

We went up to Kirk Creek as our first choice but they were full so we went back down into San Simeon SP and camped in their lower campground.  San Simeon SP is a great campground and they actually have two campground in the park, the lower San Simeon Creek and the upper Washburn. 

Washburn is about 1 mile from the beach access and is set up for RVs mainly but we've tented there just fine.  It is not fancy there and do not have flushing toilets or showers but endless skies at night and wonderful hiking/biking trails.

San Simeon Creek is set up for tents and RVs and it has flush toilets and showers but are currently under water restrictions so they are not in use. In the lower camp you can walk under Highway 1 to the beach. About 1-2 miles up the road is Hearst Castle and state beach.  It's a great paddle spot and they do have kayak rentals there.

I'll leave you with another camp cooking tip.  Marinade and freeze your meals ahead and mark them.  It makes cooking easier.  They also making aluminum foil grilling bags which I cut in half and used them as potato bags.  They are extra strong so they can be put in the coals.

Tri-tip, roasted green beans, baked potatoes, and garlic biscuits baked in the dutch oven.

Well I am going to sign off for now but I will be adding more this week as I make improvements and add some touches to the trailer.  Thanks for reading.